There are currently two formats for 3D images on our site, Stereo Pairs and WOBBLEVISION. The stereo pairs give an accurate 3d view of the subject with depth throughout the image, they do however require use of the parallel viewing or crossed eye techniques for naked eye viewing. WOBBLEVISION images give a limited 3D effect which is usually only effective for a section of image, the advantages are that no special technique is required to view them and the images can be larger than the stereo pairs.
All of the stereo pairs in this site can be viewed with the naked eye using techniques known as parallel viewing or crossed eye viewing. Parallel viewing is the same as that used to view the "Magic Eye" random dot stereogram pictures and posters that were popular a few years ago. When either of these methods are accomplished they will yield true 3D views.
PARALLEL VIEWING
The idea behind parallel viewing is to look at the screen whilst focusing your eyes on an imaginary distant spot. This may sound a bit difficult, but there are several tricks you can employ, and once you have viewed the images a few times using these you will find viewing much easier.
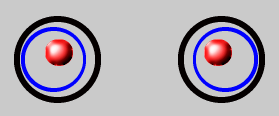
Use the test images above to practice your viewing. Look between the circles and focus your eyes on the distance, the circles will gradually move in toward each other and then fuse to form a third image in the centre. This image will be in 3D with the red spot floating above the black circle with the blue circle in the background. If you can view this, you can view all of the 3D
images on this site.
Some people will be able to view the test image first time, others may simply need practice, or one of the tricks below.
Note that it's probably easier to view the images at closer distances than normal, I usually start viewing about 30-40cm away from the screen, once you "get a lock" on the image you can move back. As you continue with a viewing session you will find that the images will fuse at further and further distances as your eyes become used to the method. Another effect you will notice as you become more practiced with parallel viewing is that the perceived depth of the image will increase and you will be able to "look around" within the image with ease.
If you wear glasses to correct mild short sight you may find it easier to view the images without them.
If anyone is lucky enough to have an optical viewer for stereo pairs, you should be able to use this to view the images without the usual ocular gymnastics.
Now for the tricks:-
The divider trick.
Sometimes people have problems with their eyes becoming confused over which image they should be seeing. Place a piece of card or paper about A4 or letter size on the division between the images and then align this with your nose. This forces each eye to see only the image intended for it and stops confusion. Now, imagine that the screen is a window and you are looking out through it into the distance, the images should now fuse easily into 3D.
Note that because each eye can only see one image, when the images fuse there
will be only one image, the two "side images" do not appear with this
method.
The nose on the glass trick.
The idea here is to force distant focus from the outset. Put your nose very close to, or on, the screen between the images. Wait a little while, as your eyes cannot focus this close, they will default to distant focus. Now, slowly move your head away from the screen and try to keep your eyes at the same distant focus, at some point the images should merge into 3D. You may find that you nearly get the 3D image, but then your focus "slides off" into close focus, keep trying!
The reflection trick
As an aid to attaining the distant focus required, you can view the reflection of a distant object on the surface of the monitor screen.
A bright window is a good target, even for screens with anti-reflection coatings. Angle your screen so that the reflection of the window is over the test target, put your eyes about 30-40cm from the screen and look at the reflection, try to see out of the window, now allow your eyes to become aware of the test target. You may find that you cannot stop your eyes focusing in closer when you become aware of the target, simply refocus on the window reflection and keep trying.
Once you can view the test target reliably, move onto the real images. They can be a little more difficult to view than the test target, so we have put guide spots above each image, if you have difficulty, just stare at the guide spots and fuse them together first. Now move your gaze down onto the image and you should be seeing in 3D! Of course, you can use any of the tricks above to help view the real images.
NOTES
SIZE
The parallel view images are small as they are designed to be viewable on a 17 inch monitor at 800x600, this decided their maximum size as there is a limit to the angle of view the human eye can "pull in" for 3D viewing. People with larger screens will be using higher resolutions, so the images will actually be smaller and easier to view in these cases. But if there is anyone out there running a 21 inch display at 800x600 -
you are going to have problems with our parallel view images for naked eye viewing!
This is the opposite of the above method, the eyes focus on a point in front of the screen to reveal the 3D view. Through trial we have discovered that crossed eye viewing allows a much bigger potential area of view than parallel viewing with most people. As we want to give you as good a view as possible, we will be using the crossed eye method as standard in future.
Sit in front of your monitor as usual and hold a thumb up between the 3d image pair and your eyes. Start with the thumb closer than a quarter of the distance between your eyes and the screen, now focus on the thumb as you slowly move it towards the screen. At some point you will become aware of a fused 3d image appearing on the screen behind your thumb, move the thumb back and forth slightly to get the best image depth. Now you should be able to gradually switch awareness from your thumb to the image, if it slips away, look at your thumb again till it reappears. The distance of the thumb is pretty critical, so make small movements as you "tune in" to the image. Eventually, you will be able to move your thumb away and still hold a lock on the 3D image.
As with the parallel method, you will probably have to re-establish the lock when you move from one 3D image to another.
Both of the viewing methods are sensitive to "tilt" within the image, once you "get a lock" on the 3D image try tilting your slightly head left and right, you may find that this helps clarify the image.
ALTERNATIVE
VIEWING METHODS
There are number of other ways to view 3D images, but most require equipment such as red-blue glasses,
optical stereo viewers or LCD shutter glasses, So, we settled on parallel viewing
and crossed eye viewing as equipment-free methods, also, many people would have previously tried
parallel viewing with the "Magic Eye" stereograms. For folk who cannot manage the parallel viewing
or crossed eye methods we now have WOBBLEVISION.
Anyone can view a WOBBLEVISION image and see a 3D effect, no strange eye movements or exercises are necessary! These images use a different method to give an impression of depth in the image, while they are a poor substitute for the true 3D depth given by stereo pairs, at least those who cannot manage parallel or crossed eye viewing can see something. WOBBLEVISION images can also be bigger than naked eye parallel stereo pairs and we think that they are a lot of fun.
Some people can feel a bit "seasick" when viewing these images, so if this bothers you we suggest you persevere with the crossed eye or parallel viewing methods for our stereo pairs.
WOBBLEVISION uses the brain's ability to deduce depth information from the parallax within a scene, the wobbling movement of the images ensures that this sense is triggered continually so that an enduring 3D effect is created. Note that the brain collects parallax information from relative object movement within a scene only, so binocular vision in not required! Even people who have lost sight in one eye will be able to view the 3D effect of WOBBLE VISION .
We got the idea for WOBBLE VISION from another of our interests, astronomy. We were familiar with the Blink Comparison method used in astronomy for the rapid detection of asteroids and comets, and we realised that this might also be pressed into service as a method of showing 3D images, so we gave it a whirl and WOBBLE VISION was born!